

I'm excited to share some fun little "arts"
using tim's new distress markers...
I have been patiently waiting for these markers,
since the distress pads came out...
YES...that long...
let me just say...
they are well worth the wait...
I really wanted them to ink small areas...
but when tim showed me the magic of these markers,
I about fainted...
like the title says...
PURE MAGIC...
you'll see...
here's the first "art"...
it's an ATC made from
Ranger's new "specialty stamping paper"...

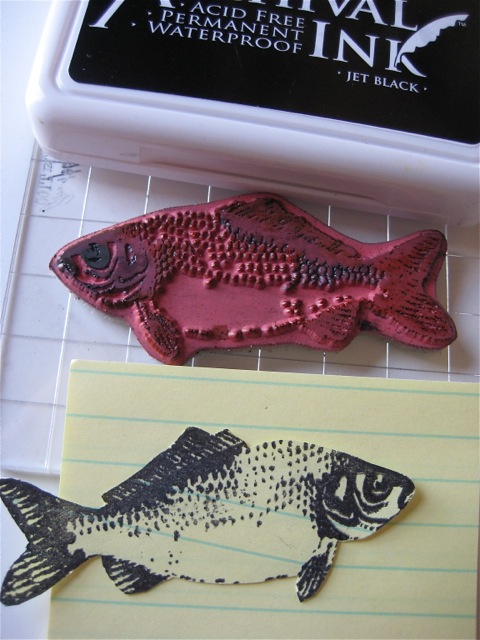
let's get started...
use the distress markers to color right on the fish stamp...
it doesn't matter if you go from light to dark to dark to light...
just randomly color...
overlap...it doesn't matter...
I used rusty hinge, broken china, peeled paint, black soot & mustard seed distress markers...
you DO NOT need to work quickly...
to rehydrate the inks before stamping,
just lightly huff on the stamp...
stamp & dry...
it takes just a little huff...not a big blast...
your fish should look like this...

next, use the blending tool with bundled sage & broken china to ink over the entire ATC...
do you see the MAGIC?
normally distress inks blend & create beautiful custom colors...
but look...
the markers resist the distress inks &
the color is still vivid...
MAGICALLY...
the markers have NOT blended with the background...
next...
fill in the fish with rusty hinge on the blending tool & dry...

now create a mask,
by stamping the fish onto a post-it note, using jet black archival...
make sure to stamp a portion of the fish over the sticky area of the post-it...
that will hold it in place & the post-it won't leave any residue on the ATC...
cut it out...right on the outline of the stamp...
or even a tiny bit inside the stamped image...
*tip* if you cut outside the line & make the mask larger, it creates a halo around the image...
and you won't have any background stamping there...
place the mask right over the fish...
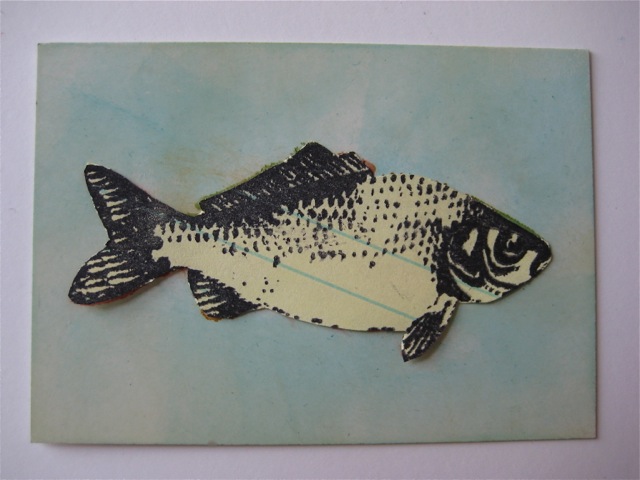
ink the background stamp with olive archival & randomly stamp over the fish...
I usually don't press over the whole background...
I like the random, worn look...
leave the mask there...

now ink the bubble background with
aquamarine archival & stamp over the entire ATC...

remove the mask, then add shading to the edges with walnut stain & the blending tool...
it will now look like this...

stamp the saying, using jet black archival...
*TIP*
stamp the full saying first...
then stamp a portion of it on both sides of the saying to create a continuous saying...
add some simple doodling with a waterproof pen...
that's it...


I mounted mine on black card stock...
and added Glossy accents to the eye & for some bubbles...

*WARNING*...
these markers are like potato chips...
you can't do just one...
don't like fish?
here's the same technique,
with a little twist,
using my tree stamp, forest moss, peeled paint, fired brick, walnut stain & brushed corduroy distress markers...
ink the tree with the markers...
huff, stamp & dry...
this time I used watercolor paper...
it looks like this...
you'll see the image is NOT perfect...
I missed some areas...
it doesn't matter...
trust me!

next, use the new detailer water brush to go over the tree...
do it quickly...
not real precisely...
this creates a cool watercolor effect...
dry it & it will look like this...

then add background colors with distress inks & the blending tool...
just as in the first ATC...
I used brushed corduroy & broken china,
then walnut stain around the edges...
this background was randomly stamped with
aquamarine archival & dried...
Lady Dy showed using large backgrounds without the acrylic mount...
just roll the inked stamp over select areas & you don't end up with harsh edges...
LOVE IT!
the saying was stamped with jet black archival...
*TIP*
here's a fun way to use the water brush...
I used it to make the water spots...
tap a tiny amount of distress stain onto your craft sheet...
add a bit of water with the water brush...
I used broken china first & then brushed corduroy stains...
pick up as much color as the brush will hold & tap the brush against your hand to create the drops...
what's cool is that the distress inks in the background react with the water, so you add color from the stains & a bleaching effect, because of the water...
here's the finished piece...
this is 2 3/4 inches x 4 inches...
and it's cut from Ranger's manila card stock...

I couldn't stop...
here's one more...
this time a flower...
this is a 3 1/2 x 5 journal page...
cut from the manila card stock...
I colored the stamp with these marker colors...
rusty hinge, fired brick, peeled paint & forest moss...
stamped it once on the right...
then huffed on the stamp to get the second generation (lighter) image on the left...
dry it...


and again...
I went over the the stamped images
with the detailer water brush...
added the background...
stamped portions of the background,
with aquamarine archival again...
my new favorite...
stamp field notes & the saying with jet black archival...
accented the flower centers with
the black Sakura glaze pen...
that tiny dot defines the flowers...
this took a total of 10 - 15 minutes...
for something so quick & easy...
I like the result...

I hope you can see how much fun the markers are
and that they really are MAGIC MARKERS!
ok...studio time for me...
I gotta
make art!
wendy
52 comments:
Very cool effect. Have to make a card so this technique will come in handy later. Thanks for sharing with us!
those markers are so cool!!!
You art is beautiful!
Wendy -
Love your art! Just gorgeous, each and every one. And yes, the markers are magic, darn it! I knew I'd cave and get them - LOL!
Elaine Allen
I've seen a video of Tim demoing the new distress markers and was so excited! A wonderful friend gave me 3 as a gift. I've played with them a little. After seeing your 3 lovely pieces I feel so inspired I'm headed back into the studio to create some more. I love your beautiful artwork. Thanks for the inspiration!
Beautiful art, and I want them all - now! Oh my poor wallet....
These are beautiful. I sure hope my scrapbook store gets these markers in!!
Oh! What beautiful ideas! Roll on my birthday - I Wang to play NOW!!!! Thank you for firing up our creativity once again!
you are such a tease wendy with your gorgeous projects...i was enthralled when I saw tim demo these markers at Stitches in the UK...can't wait for mine to arrive...hugs kath xxx
I HAVE TO HAVE THESE MARKERS :) You are my favorite enabler Wendy, I was going to hold strong (yeah right) and really think about getting the markers .. but I just have to have them !! Time to shop :) LOL Thanks Wendy.. have a great day.
Fab! Fab! Fab! I can't wait until I have the money to get some.
Simply stunning Wendy ... I have got to get me thee pens and try out your techniques.
xx
Thanks for sharing these tips Wendy. I have my first 12 colours and now need more!!!! They're fab!
Hugs
Lesley Xx
Fabulous! Thanks for the great inspiration - my mojo needs a kick!
I am in lurve with the new Markers... I was demo-ing that flowery sprig stamp all last weekend because you can get right on in and do the individual dots... THANK YOU for the fabby fishy tips... I still haven't got him living in my Room of Stash.. he is next on the need list.. I mean wish list rofl
Thanks for the tips etc Wendy.. bless ya! Hope you having a goodly week... lotsa love xxx
3 lovely examples! With these new markers we can all look like watercolor artists... we ARE all watercolor artists. How exciting!!!
love all these techniques you shared!!!
I was trying to ‘resist’ the distress markers, but between you & Tim…how can I ‘resist’…lol
hmmm...guess I don't need groceries this week:)
they just arrived today! whoohoo...off to play...luv that fish!
I received my Distress markers last week and was wondering how to use them in an effective way! Thank you, for showing us these pointers! I too, will be off to see if I can make some art!! :))
Love your artwork, Wendy!
I'm still waiting for my Distress markers ... cannot wait! The techniques you shared are fabulous ... will definitely be giving them a try!
Oh Wendy, they look fabulous. But I have all the promarkers and do I really need the Distress Pens too. The answer is probably yes, but I cannot afford them. Really envious now. Hugs Rita xxx
Okay, so maybe now I really do *NEED* those distress markers asap! Cool shares! Just saw all your new stamps and Art Parts at The Scrapbooking Studio in Bloomington - wahoo!!! Gotta start shopping!
How lovely :D I have had a quick playy too and found them great for colouring the debossed areas of my embossing folders, huffed and then squished - perfectly inked embossing :D
Julie xx
Oh wow! Like you, I was just thinking I needed these to get into those small areas. Thanks so much for all of the great info. As usual, I love your projects.
Great to see what you made with these markers!
There you go teasing us again as we anxiously await the arrival of our markers. LOL Now I really want mine now!
Fabulous artwork - buy you are very naughty teasing and temping us all - I soooo want (no need) the distress markers
WOW! Each art piece is wonderful! I can see why you love the markers - great addition to my studio.
looks like a lot of fun - thanks for sharing some inspiration!
Sandra ltb
Oh WOW...those are all amazing!!!!! LOVE those
these markers are great, will have to have them. mr. post man delivered my books today, thank you for my something extra. I will be doing some projects this weekend.
these markers are great, will have to have them. mr. post man delivered my books today, thank you for my something extra. I will be doing some projects this weekend.
I like the fish and the bubbles and the inks and the water brush and the markers ...like patatoe chips? Thanks for the warning i know to buy them all at one time lol is there a cat or a fishing net to go with the here fishy? we need a cat.awesome art i addicted no doubt.
nice- thanks for sharing
I was excited before I placed my order for these markers - now I can hardly wait!!!!! I think I may need to schedule some time off work when they arrive.
I NEED these markers in my life! Thanks for the fab tips and pics. Zo xx
Beautiful!
Loving these little mini makes. particularly the last one.
** Kate **
LOVE LOVE LOVE LOVE the fish!!! I was on the fence about these markers but now I NEED THEM!!! Thanks for sharing!! (my hubby thanks you, too - I am sure. Ha Ha)
OOOOOOMMMMMMGGGGGG....I had no idea the markers were that fabulous. Ahhh dang, I thought I finally had everything I could possibly want.
Love the water color effect on the tree. These markers are on my want list.
Gloria
I pre-ordered my marker set over 2 weeks ago! Love these samples! Can't wait to get 'em!
These are all fabulous!!!!!!!!!!!! Received my book yesterday... LOVE the new format!!!!
Very cool tips and techs with the new markers, love the ATC's!
So love these projects!! I passed on the markers so I could afford other things, I'm so regretting that decision now that I'm seeing all of these great, gorgeous pieces that everyone is doing using them!!
All of these are just fantastic Wendy...quick and easy and I love your tips and hints! I still find it so crazy wonderful that the markers act as a resist...absolutely brilliant. I have the fish image...time to play I think! Thank you so much for the inspiration here!!!
Lovely....and waiting for my own to arrive....great stamping!
I just got the markers and the specialty stamping paper!!!! Thanks for more inspiration! Miss you and hope you're doing well.
Linda
Not that I really needed convincing, but your post has sent me straight to one of my favorite online shops, and I just ordered the whole set!
Oh, and the specialty paper, too, LOL.
OH THAT STAMPING PAPER looks very exciting to use. Rosemary
WOWZA...the fish is amazing and i love the little tip about making sure you stamp on the stickie portion of the post-it...seems to me I learned that once but of course forgot it until I read your post.....When oh when will we get the markers?
So love these projects!! I passed on the markers so I could afford other things, I'm so regretting that decision now that I'm seeing all of these great, gorgeous pieces that everyone is doing using them!! locket necklace wholesale uk , pura vida bracelets canada ,
Post a Comment